Compose the Stone Landscape Before You Think About the Carpet
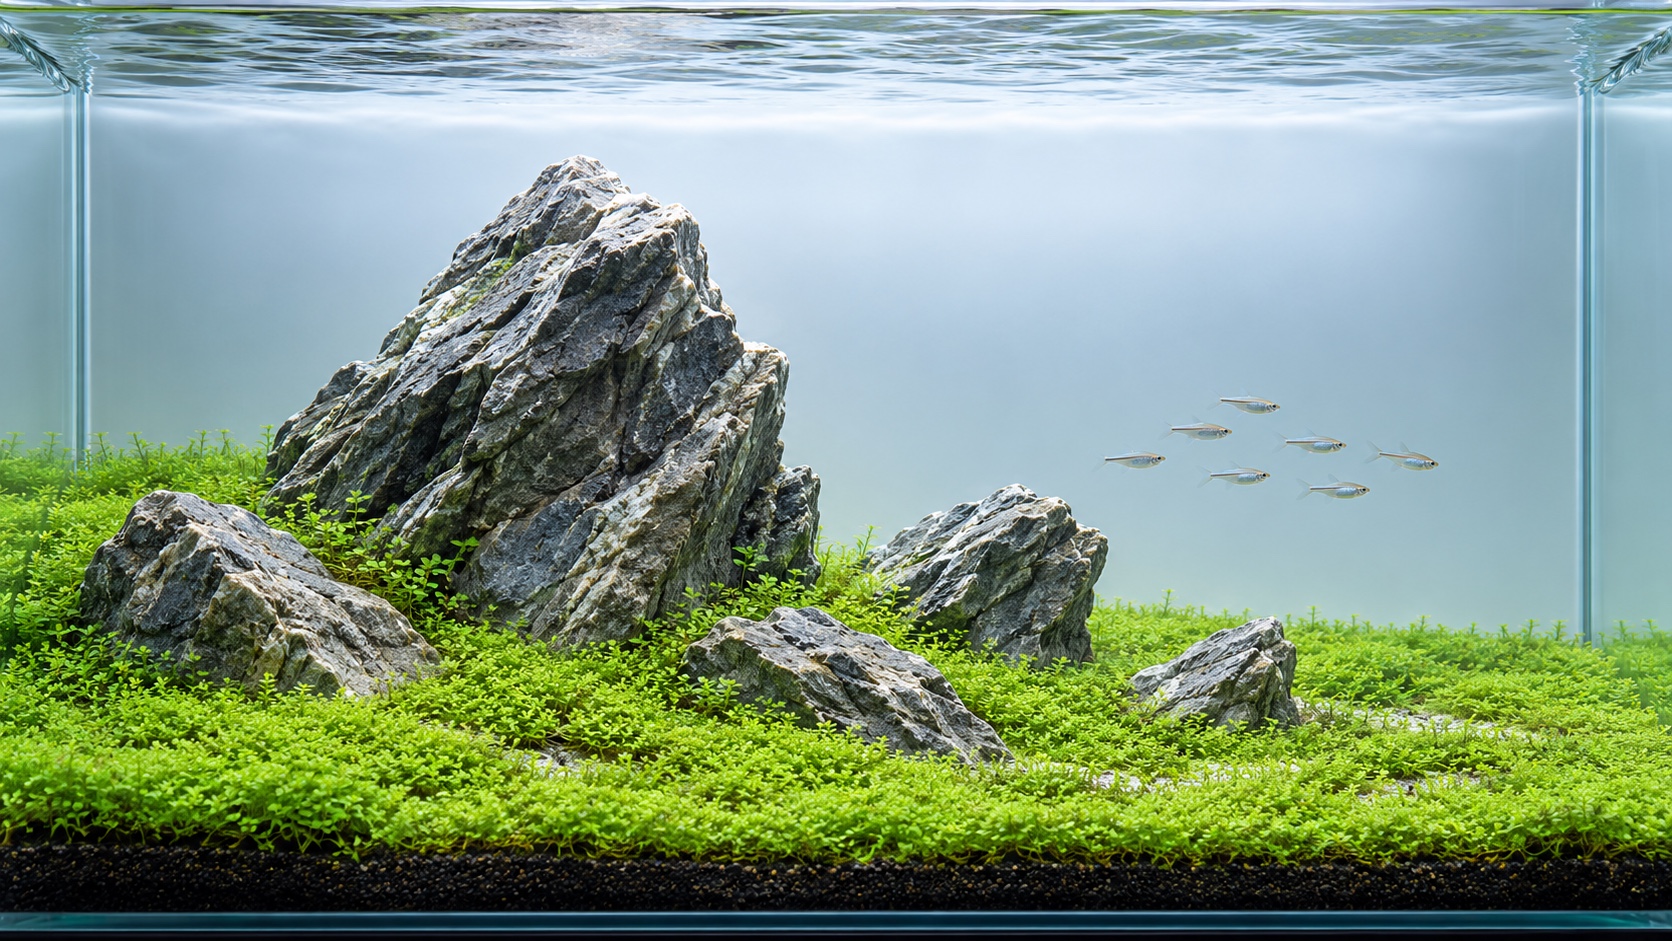
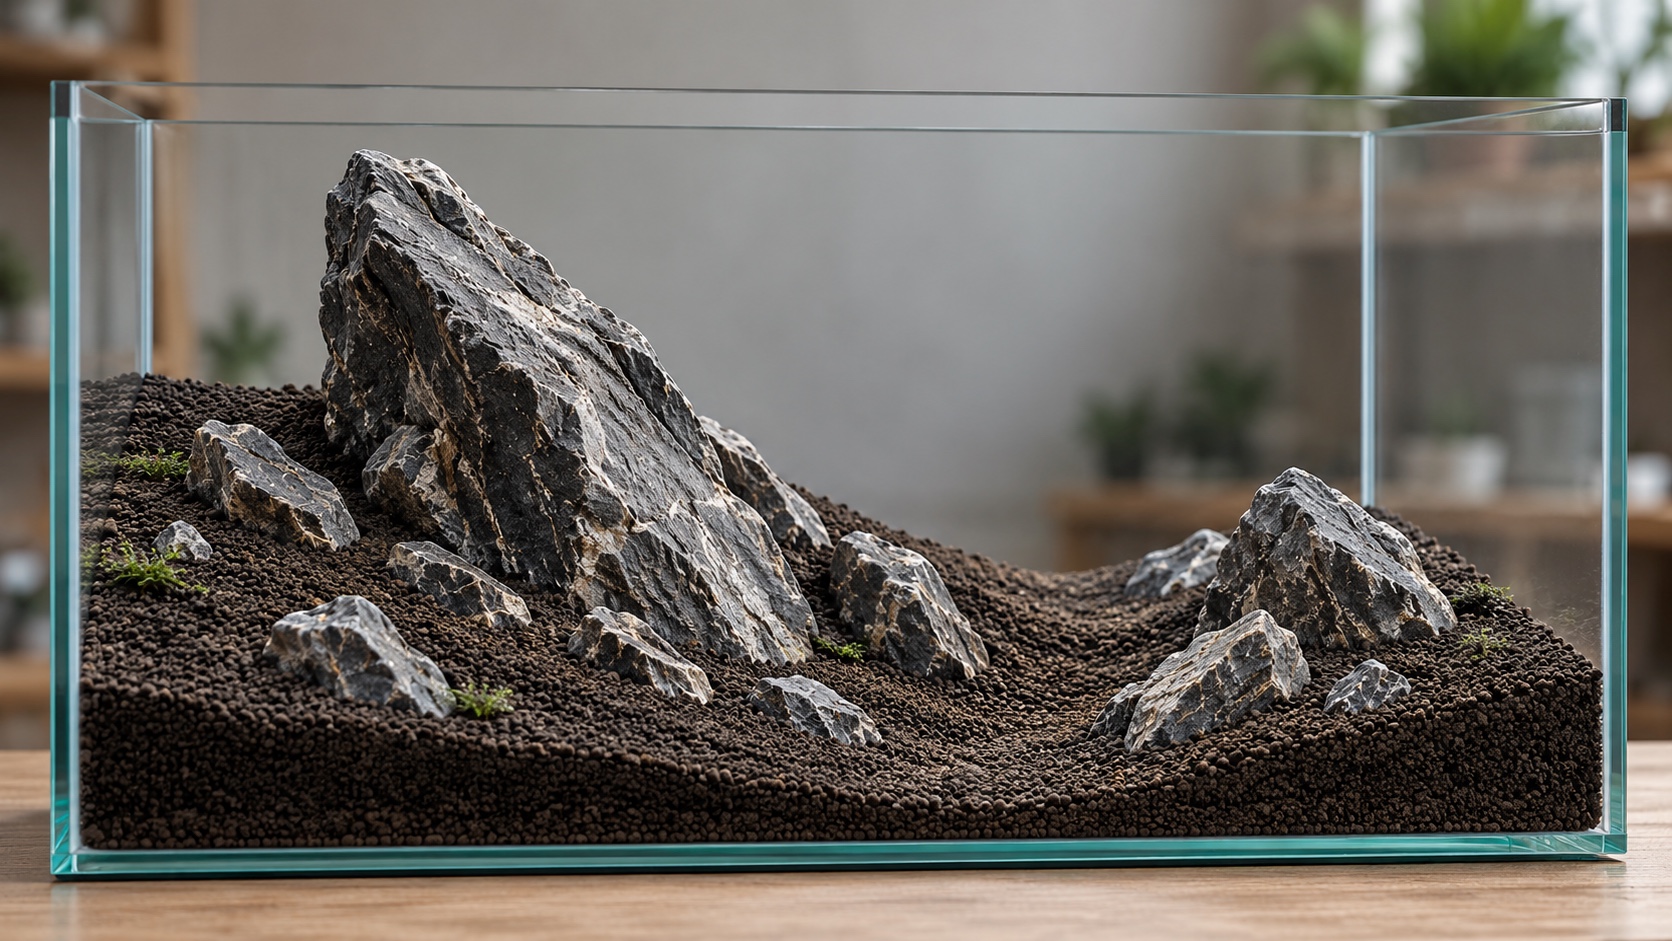
Creating an Iwagumi aquascape begins with dry stonework, not planting. The layout must already carry direction, scale, and tension while the aquarium contains only substrate and rock. Plants will later soften joints and extend the terrain, but they cannot rescue a formation with equal stones, hesitant angles, or no negative space. The most productive way to build is iterative: choose a primary stone, establish its lean, cluster support stones by relationship, photograph the arrangement, and remove anything that weakens the whole. This guide concentrates on composition and construction, then connects those decisions to plant choice, startup, and maintenance. The aim is a landscape that remains readable after months of growth rather than a dramatic dry layout that disappears under its own carpet.
A: Test until one clear hierarchy and open-space pattern consistently reads best in photographs; there is no required count.
A: It can, if the perspective feels intentional, the structure is stable, and safe clearance is maintained.
A: They should feel geologically related, but slight variation keeps the group from looking mechanically repeated.
A: Bury enough to ground each piece and vary exposure while retaining the faces needed for hierarchy.
A: Parallel edges, constant width, and a visible flat endpoint often make a valley feel artificial.
A: Choose them after the stone structure and intended terrain are clear, then match them to the operating system.
A: Not always. Variation in height and density can support erosion patterns and keep stone bases visible.
A: Capture the straight-on layout, normal viewing distance, side stability, and every stone face you intend to preserve.
A: Protect its height, clear its key face, control competing peaks, and trim nearby plants lower.
A: It is finished when every visible stone supports the formation and the open area feels intentional without another addition.
Define the Terrain With a Simple Silhouette
Decide whether the formation will rise strongly from one side, create a central valley, or form a lower island-like ridge. Sketch only the top line and the largest open area. A triangular silhouette is often effective because the eye can travel from the dominant high point into open ground. A valley creates depth but needs enough front-to-back space to avoid looking like two unrelated piles.
Name the implied landscape: exposed ridge, weathered mountainside, grassy pass, or stones in a broad plain. The phrase prevents later additions from pulling the design in competing directions. An exposed ridge may need sharper rock faces and sparse planting, while a grassy pass depends on lower lines and a protected corridor.
Build a Full-Size Practice Box
Mark the aquarium footprint on cardboard or a shallow tray and add a backdrop at the correct glass height. Practice outside the tank so stone can be rotated safely and viewed without reflections. Use temporary inert material to represent the soil slope. Photograph every arrangement from the intended eye level rather than from above. Place a strip of tape where the future carpet top may reach. This simple horizon reveals when an attractive small stone will vanish after planting. It also shows whether the primary stone consumes too much height and leaves no visual water above it. The mock-up should represent the mature scene, not only bare rock.
Choose the Primary Stone by Shape and Stability
The primary stone needs a convincing base, a clear direction, and enough visible height to survive planting. Test multiple faces. A striking peak can be useless if its stable orientation points the strata out of the composition. Look for a surface that leads upward and inward, then decide how much of the lower mass will be buried.
Place it off center and tilt it decisively. Small tentative angles can look accidental, while extreme leans may feel unstable. The surrounding slope should support its direction rather than contradict it. Step back and check whether the stone still leads the scene when reduced to a dark silhouette.
Do not lock the first position immediately. Move it forward, backward, higher, and lower while keeping the basic lean. A shift of a few centimeters changes the open area and the apparent scale of every future support stone. Photograph the strongest alternatives before choosing.
Add Supporting Stones as Parts of One Formation
Place the second stone near the primary stone where it can reinforce the base or continue the line. Its role should be clear but subordinate. Turn its strata in a related direction and vary how deeply it is buried. A third stone may stabilize the opposite edge or extend the formation toward the open plain.
Avoid making a family portrait in which every rock stands separately for the camera. Overlap edges, hide parts, and allow the viewer to infer stone beneath soil. Use small fragments where erosion would collect them, not as evenly spaced ornaments. If one support stone attracts as much attention as the primary stone, reduce its exposure or replace it.
Carve Negative Space Instead of Filling the Tank
Protect the open area from the beginning. Its outline should have character: a narrowing valley, a broad field, or a curved passage around the formation. Avoid an equal empty strip around every stone. Let the rock mass press toward one area and release into another. That contrast creates movement without adding objects. Check how the open area meets the glass. A passage that runs straight into a front corner can feel abruptly cut off, while a slight curve or foreground widening lets the landscape continue beyond the frame. Keep the distant end partly concealed so the viewer imagines depth behind the last visible stone.
Engineer the Substrate Under the Composition
Seat heavy stone on a stable bottom-supported base before adding loose planting soil around it. Follow the aquarium manufacturer’s protection guidance and avoid point loads against glass. Build rear elevation with aquarium-safe inert fill contained in mesh where appropriate. Retaining pieces can hold terraces while remaining hidden.
Pack substrate around buried rock edges so the stones appear to emerge from terrain. Keep the front layer deep enough for roots but lower than the back. Test the structure with gentle pressure from several directions. Maintenance, siphons, and livestock may eventually bump the formation; adhesive alone should not be the only thing preventing movement.
Create shallow depressions and rises rather than one smooth ramp. Irregular terrain catches light and makes the carpet vary naturally. Preserve the main valley or open route, and check that its distant end disappears or narrows rather than stopping flat against the rear glass.
Audit the Dry Layout in Photographs
Take straight-on, three-quarter, and normal-room-distance photographs. Convert one image to grayscale or reduce saturation mentally to judge mass and hierarchy without being distracted by stone color. Trace the line from the primary stone through the supports. If the eye jumps randomly, adjust overlaps or remove a competing peak.
Check tangencies where rock edges almost touch the glass or align awkwardly with another peak. Confirm that small stones remain visible after an imagined carpet grows several centimeters. Mark areas that must stay bare and the maintenance paths around stone faces. Do not add water until the formation works in multiple photographs.
Select Plants That Preserve the Stone Hierarchy
Choose one principal low plant whose growth habit matches the available light, carbon dioxide, nutrients, and care. A second fine grass or compact transition may emphasize the rock base, but keep the palette restrained. Estimate mature height around every visible stone. Small accents need greater exposure or regular clearing if they are to remain part of the design.
Research how the plant responds to trimming and whether it spreads by runners, creeping stems, or clumps. Those habits determine the maintenance geometry. A runner can cross a protected soil line quickly, while a thick creeping mat may lift when its shaded base weakens. The design should anticipate the plant’s method of movement instead of treating every carpet as interchangeable.
Prepare a substitute before buying if the preferred species proves unavailable or unsuitable for your water. The substitute should fill the same visual role at the chosen energy level, even if its leaf shape differs. Changing the entire equipment plan to serve one difficult foreground plant often creates more risk than choosing a slower, taller alternative.
Plant by Density and Erosion Pattern
Divide the main plant into small plugs and place them across damp soil. Use denser spacing on sheltered slopes and wider gaps on exposed faces or the open route. This variation resembles uneven colonization and keeps the first layout from looking like a planting grid. Avoid disturbing the packed bases of the stones. Plant transition species only where they explain the terrain, such as a protected hollow or the rear of the main formation. Leave selected soil visible near sharp rock edges. Mist the work during planting and remove loose grains from prominent faces before filling.
Fill slowly over a plate or plastic sheet. Pause at shallow depth to replace floating plugs and inspect rock stability. Once the tank is full, adjust broad circulation so it reaches the carpet without scouring substrate from the valley.
Start With Controlled Energy
Set a conservative photoperiod and intensity while roots establish. If using pressurized carbon dioxide, stabilize safe delivery and distribution before increasing light.
Follow a complete nutrient method appropriate to the substrate and plant mass. Early growth should be predictable before it is fast.
Active soil may release ammonia or alter water chemistry during startup. Test the water, perform suitable changes, and establish biological filtration. Remove melting tissue and debris while preserving healthy plant mass. Do not add fish because the layout needs movement for a photograph.
Use the First Trim to Reveal the Terrain
Trim when the carpet is rooted and beginning to mound. Cut higher on slopes where a thicker meadow supports scale and lower beside important stone faces. Remove loose cuttings thoroughly. Thin any mat that is shading its base rather than repeatedly clipping only the surface.
Work in small zones so the intended height remains visible. A uniform pass with scissors can flatten the hillside and make carefully arranged rock look placed on a lawn. View the tank from the front after each zone, then blend transitions with shorter targeted cuts. Stop before the carpet is reduced so severely that roots lose too much supporting foliage.
Add Livestock That Can Use the Open Water
Select fish only after cycling, using adult size, group needs, water chemistry, temperature, and security requirements.
A single suitable school can extend the direction of the stones, but it must have enough length and cover to behave normally. Introduce livestock gradually and quarantine when possible.
Keep feeding controlled and observe where waste collects. The visual valley may also be a hydraulic low point. Adjust the filter return for broad circulation and lift settled particles during water changes without digging into stone foundations.
Maintain the Original Relationships
Compare the mature aquarium with the dry-layout photographs. Restore the open route, uncover subordinate stones, and keep the primary face dominant. Clean rock gently and pull runners before they occupy planned bare areas. Small corrections made often preserve the composition better than a disruptive reset.
Inspect the structure after any deep trim or large water change. Removing a thick mat can expose soil that plants had been holding, while draining can reveal a subtle lean that was difficult to see through refraction. Do not push a heavy stone casually to improve appearance. If stability has changed, lower the water and make a controlled structural assessment.
An Iwagumi remains strong when stone direction, negative space, and plant contour continue to tell the same story. Growth should make the formation feel older and more grounded, not bury the design. When removing one extra detail improves the scene, trust the restraint that defined the layout from the beginning.
Seasonal room light, plant growth speed, and water chemistry can alter how the aquascape reads. Preserve the core relationships rather than freezing every blade at one height. A living Iwagumi may look fuller in one month and newly cut in the next, yet the primary stone, directional line, and open field should remain unmistakable.
Set one viewpoint for routine evaluation, but inspect the structure from the sides as well. The front view governs the composition; side views reveal unsupported soil, trapped debris, and roots approaching the glass. Correct functional problems early while leaving harmless imperfections that are invisible from the intended viewing position.